본 포스팅은 쉽게 배우는 자바 프로그래밍 교재를 바탕으로 작성되었습니다.
Chapter 06장 상속
📍도전 과제
01. 그림과 같은 멤버를 가진 상속 관계의 클래스 3개를 명시적인 생성자 없이 작성해보자.
클래스
public class Girl {
    String name;
}

class GoodGirl extends Girl{
    void show() {
        System.out.println("그녀는 자바를 잘 안다.");
    };
}

class BestGirl extends GoodGirl{
    void show() {
        System.out.println("그녀는 자바를 무지하게 잘 안다.");
    };
}
<Test 코드>
test 코드에서 g2.show(); 가 주석인 이유 : g2는 GoodGirl인 자식타입을 Girl인 부모타입의 객체에 대입한 객체이다. 그렇기 때문에 부모 타입 변수라고 할 수 있다. 필드이기 때문에 동적 바인딩이 되지 않고 부모의 멤버 필드가 출력된 것이다.
public class GirlTest {
    public static void main(String[] args) {
        Girl g1 = new Girl();
        Girl g2 = new GoodGirl(); //자식을 부모객체에 대입
        GoodGirl gg = new BestGirl(); //자식을 부모객체에 대압

        //g2.show();
        gg.show(); //동적바인딩으로 무지하게 잘 안다 출력
    }
}
02. Girl 클래스와 자식 클래스에 다음 그림을 참고해서 Girl 클래스에만 생성자, private 필드, show() 메서드를 추가한 후 실행해 보자.
public class Girl {
    //생성자
    Girl() {};
    Girl(String name){};

    private String name;
    void show() {
        System.out.println("그녀는 자바 초보자이다.");
    };
}

class GoodGirl extends Girl{
    void show() {
        System.out.println("그녀는 자바를 잘 안다.");
    };
}

class BestGirl extends GoodGirl{
    void show() {
        System.out.println("그녀는 자바를 무지하게 잘 안다.");
    };
}
03. 다음을 참고해 Girl 클래스의 필드에 대한 접근 범위를 변경하고 자식 클래스에도 생성자를 추가해보자.
public class Girl {
    //생성자
    public Girl(String name){
        this.name = name;
    }
    protected String name;
    void show() {
        System.out.println(name + "는 자바 초보자이다.");
    }
}

class GoodGirl extends Girl{
    GoodGirl(String name) {
        super(name);
    }
    void show() {
        System.out.println(name + "는 자바를 잘 안다.");
    }
}

class BestGirl extends GoodGirl{
    BestGirl(String name) {
        super(name);
    }
    void show() {
        System.out.println(name + "는 자바를 무지하게 잘 안다.");
    }
}
📍프로그래밍 문제
01번. 다음 표와 실행 결과를 참고해 Circle 및 자식인 ColoredCircle 클래스를 작성하라. 그리고 Circle과 ColoredCircle 객체의 show() 메서드를 호출하는 테스트 프로그램도 작성하라.
public class Circle {
    int radius;

    public Circle(int radius) {
        this.radius = radius;
    }

    void show() {
        System.out.println("반지름이 " + radius + "인 원이다.");
    }

}

class ColoredCircle extends Circle {

    String color;

    public ColoredCircle(int radius, String color) {
        super(radius);
        this.color = color;
    }

    @Override
    void show() {
        System.out.println("반지름이 " + radius + "인 " + color +"색 원이다.");
    }


}
public class TestCircle {
public static void main(String[] args) {
Circle c1 = new Circle(5);
ColoredCircle c2 = new ColoredCircle(10, "빨간");
c1.show();
c2.show();
}
}
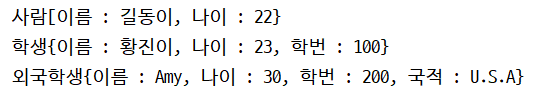
02. 다음 표와 실행 결과를 참고해서 답하라. show() 메서드는 객체의 정보를 문자열로 반환한다.
public class TestPerson {
    public static void main(String[] args) {
        Person[] person = { new Person("길동이", 22), new Student("황진이", 23, 100)
        , new ForeignStudent("Amy", 30, 200, "U.S.A")};

        for (Person p: person)
            System.out.println(p.show());
    }
}

class Person {
    String name;
    int age;

    //생성자
    public Person(String name, int age) {
        this.name = name;
        this.age = age;
    }

    //접근자
    public String getName() {
        return name;
    }

    public int getAge() {
        return age;
    }

    public String show() {
        return "사람[" +
                "이름 : " + name +
                ", 나이 : " + age +
                '}';
    }
}

class Student extends Person {
    int grade;

    public Student(String name, int age, int grade) {
        super(name, age);
        this.grade = grade;
    }

    public int getGrade() {
        return grade;
    }

    public String show() {
        return "학생{" +
                "이름 : " + name +
                ", 나이 : " + age +
                ", 학번 : " + grade +
                '}';
    }
}

class ForeignStudent extends Student {
    String nationality;

    public ForeignStudent(String name, int age, int grade, String nationality) {
        super(name, age, grade);
        this.nationality = nationality;
    }

    public String getNationality() {
        return nationality;
    }

    public String show() {
        return "외국학생{" +
                "이름 : " + name+
                ", 나이 : " + age +
                ", 학번 : " + grade +
                ", 국적 : " + nationality +
                '}';
    }
}
03. 다음 표를 참고해 MovablePoint, MovalPoint의 부모 클래스인 Point를 작성하라. Point 클래스의 toString() 메서드는 좌표를 나타내는 문자열이며, MovablePoint 클래스의 toString() 메서드는 좌표와 이동 속도를 나타내는 문자열을 반환한다.
public class TestPoint {
    public static void main(String[] args) {
        Point p1 = new Point(2, 10);
        MovablePoint p2 = new MovablePoint(6, 11, 20, 22);

        System.out.println(p1.toString());
        System.out.println(p2.toString());
    }
}

class Point {
    private int x, y;

    public Point(int x, int y) {
        this.x = x;
        this.y = y;
    }

    public int getX() {
        return x;
    }

    public int getY() {
        return y;
    }

    @Override
    public String toString() {
        return "Point{" +
                "x=" + x +
                ", y=" + y +
                '}';
    }
}

class MovablePoint extends Point {
    private int xSpeed, ySpeed;

    public MovablePoint(int x, int y, int xSpeed, int ySpeed) {
        super(x, y);
        this.xSpeed = xSpeed;
        this.ySpeed = ySpeed;
    }

    public int getxSpeed() {
        return xSpeed;
    }

    public int getySpeed() {
        return ySpeed;
    }

    @Override
    public String toString() {
        return "Point{" +
                "x=" + getX() +
                ", y=" + getY() +
                '}' + " MovablePoint{" +
                "xSpeed=" + xSpeed +
                ", ySpeed=" + ySpeed +
                '}';
    }
}
04. 메서드는 자식 클래스가 오버라이딩 할 수 있지만, 필드는 자식 클래스가 오버라이딩 할 수 없다. 다음 표를 참고해 Parent와 Parent의 자식인 Child 를 클래스로 작성하고, 이를 아래에 있는 OvershadowTest프로그램으로 테스트하라.
public class OvershadowTest {
    public static void main(String[] args) {
        Parent p = new Child();
        System.out.println(p.name);
        p.print();
    }
}

class Parent {
    String name = "정조";

    void print() {
        System.out.println("나는 " + name + "이다.");
    }
}

class Child extends Parent {
    String name = "사도세자";

    @Override
    void print() {
        System.out.println("나는 " + name + "이다.");
    }
}
05. 다음 표를 참고해 Phone, Phone의 자식 클래스 Telephone, Telephone의 자식 클래스 Smartphone을 작성하고, 테스트 프로그램도 작성하라.
⭐ 반복문과 조건문으로 실제 타입을 조사한 후, 각 클래스에 들어있는 메서드를 호출하는 부분을 해결하느라 애를 먹었다. p의 타입을 Phone으로 선언하고 for문을 돌림 -> 그래서 instanceof 검사를 할 때 제대로 안되는 거 아닌가 라는 생각을 함.
 for (Phone p : phones) {
           if (p instanceof Smartphone)
               ((Smartphone) p).playGame();
           else if (p instanceof Telephone)
               ((Telephone)p).autoAnswering();
           else if (p instanceof Phone)
               p.talk();
       }
public class PhoneTest {
    public static void main(String[] args) {
        Phone[] phones = {new Phone("황진이"),
                new Telephone("길동이", "내일"), new Smartphone("민국이", "갤러그")};

       for (Phone p : phones) {
           if (p instanceof Smartphone)
               ((Smartphone) p).playGame();
           else if (p instanceof Telephone)
               ((Telephone)p).autoAnswering();
           else if (p instanceof Phone)
               p.talk();
       }
    }
}

class Phone {
    protected String owner;

    public Phone(String owner) {
        this.owner = owner;
    }

    void talk() {
        System.out.println(owner + "가 통화 중이다.");
    }
}

class Telephone extends Phone {
    private String when;

    public Telephone(String owner, String when) {
        super(owner);
        this.when = when;
    }

    void autoAnswering() {
        System.out.println(owner + "가 없다. " + when + " 전화 줄래");
    }
}

class Smartphone extends Telephone {
    private String game;

    public Smartphone(String owner, String game) {
        super(owner, game);
        this.game = game;
    }

    void playGame() {
        System.out.println(owner + "가 " + game + " 게임을 하는 중이다.");
    }
}
06. 운송 수단과 운송 수단의 하나인 자동차를 다음과 같이 모델링하려고 한다. 각 클래스의 show() 메서드는 필드 값을 출력한다. 두 클래스를 작성하고 아래 테스트 프로그램 OverrideTest를 실행해서 오버라이딩 된 메서드와 다형성 관계를 살펴보자.
⭐교재 예제에서 static은 상속이 되지 않으니까 오버라이딩이 안되겠지 하면서 show() 함수 앞에 static을 붙였는데, 변수가 있어서 오류가 났었다. 그래서 static 말고 다른 방법을 생각해보다가 결국 답을 찾아보았다. 해결방법은 변수에도 static을 선언하는 것이다. 그러면 오버라이딩도 안되고 동적할당도 되지 않아서 자신의 클래스의 필드를 출력하게 된다.
public class OverrideTest {
    public static void main(String[] args) {
        Car c = new Car("파랑", 200, 1000, 5);
        c.show();

        System.out.println();
        Vehicle v = c;
        v.show();
    }
}

class Vehicle {
    static String color;
    static int speed;

    public Vehicle(String color, int speed) {
        this.color = color;
        this.speed = speed;
    }

    static void show() {
        System.out.println("Vehicle{" + "color='" + color + '\'' + ", speed=" + speed + '}');
    }
}

class Car extends Vehicle {
    static int displacement;
    static int gears;

    public Car(String color, int speed, int displacement, int gears) {
        super(color, speed);
        this.displacement = displacement;
        this.gears = gears;
    }

    static void show() {
        System.out.println("Car{" +
                "color='" + color + '\'' +
                ", speed=" + speed +
                ", displacement=" + displacement +
                ", gears=" + gears +
                '}');
    }
}
'Language > JAVA' 카테고리의 다른 글
| [JAVA] 쉽게 배우는 자바 프로그래밍_8장 기본 패키지 (0) | 2022.06.13 |
|---|---|
| [JAVA] 쉽게 배우는 자바 프로그래밍_7장 인터페이스와 특수 클래스 (0) | 2022.06.12 |
| [JAVA] 쉽게 배우는 자바 프로그래밍_5장 문자열, 배열, 열거 타입 (0) | 2022.04.25 |
| [JAVA] 쉽게 배우는 자바 프로그래밍_03장 제어문과 메서드 (0) | 2022.04.24 |
| [JAVA] 쉽게 배우는 자바 프로그래밍_02장 기초 문법 (0) | 2022.04.24 |


